Hello everybody, after almost one year of effort, I am finally happy with the result of converting my 3D printer to Pick and Place machine. So I decided to release it, and named it 3DPlacer. It still needs improvement for sure, but it can already place various components in acceptable accuracy. I can use it to place 0201 components even, like shown in my channel https://www.youtube.com/@xpdiy
I didn’t expect to reach so far in this direction, after all my initial intention was to make hearing aids and help my relatives, but 0201 capacitors and resistors got in the way, therefore this project started. I have done some research back then, there are so many amazing projects out there, but at the time I wasn’t planning to spend >1K$ on the machine as it is just my hobby. The funny thing is – after one year, my total cost of making this project was far more than 1K$, and that doesn’t even count the time. But it is worth, I found it a lot of fun and learned a lot about machine control, 3D modelling and printing, stepper motor tuning, hot end fixing and making youtube videos 🙂
So in short, the design is availabe under https://github.com/xpDIY/3DPlacer, Note that different 3D printers could have different tolerance, for me the 0.2mm inner hole usually is too small, so I designed the hole to be a bit bigger. I have also included the one that is just the right size. So before printing, you need to check your printer’s tolerance.
I plan to support different 3D printers, so far I got the feedback that Creality Ender 3 Pro is a good candidate, also Sovol sv06 plus looks interesting. I don’t have those printers at hand, so if you have that, it would be great if you could share some dimension data about the hot end. I can make a model and share it.
Dimension data
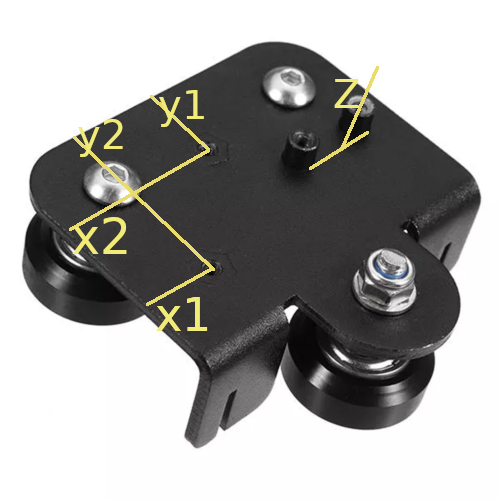
x1,x2 is the screw hole to one side of the hot end plate, y1,y2 is the distance to the top, Z is the thickness of the hot end. With these data, I should be able to make an adapter. It would be great if there is a picture as well. A picture is worth thousands of words ;).
I also plan to print out and assemble some add-on kits for people who are interested, but I am still puzzling about the shipment method, so stay tuned.
Hope you enjoy it!


Hi Xiaopeng,
I came across your PNP by chance on Youtube and first of all my congrats to how far you came with that setup and approach.
I’m somewhat fascinated by your idea and would like to give it a try by myself. I do have a Sovol SV01 printer available (with a silent stepper board), which could be a “victim” for such a modification. I’m going to dismount the print head and have a look on the mounting options of the hotend carrier plate and its dimensions, as asked for above.
Pls let me know if you still need that data and if that makes sense for you.
Another question: If I understood it correctly, the premium membership at the fee of 30EUR for one year subscription gives free access to all of your digital products (that means all the downloadable products you offer in your shop) during the premium membership period.
Correct?
Does the premium membership expire automatically after the one year period
or
will it be renewed and charged for the following year automatically? In the latter case, what will be the cancellation period if I don’t want to extend?
Regards
Andreas
sorry for late reply, the 30 EUR is for all downloadable product and it will continue for next year, if you don’t want to continue, just send me a mail, I will cancel for you and refund if already paid.